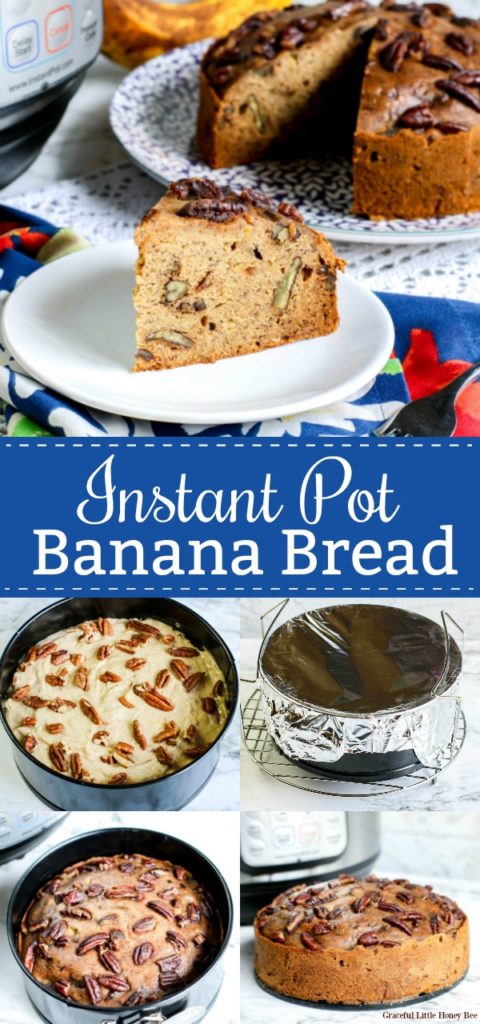
Instant Pot Banana Nut Bread {Pressure Cooker Recipe}


See how easy and fun it is to make homemade banana nut bread in the Instant Pot for a quick snack or breakfast dish!
This post contains affiliate links. If you make a purchase through one of these links, we will make a small commission at no extra cost to you. See our Disclosure Policy for more information. Thank you for your support.
Instant Pot Banana Nut Bread
Who doesn’t love a nice warm slice of homemade banana nut bread? Furthermore, who doesn’t love finding fun and new ways to make use of the most amazing appliance ever?? You know I’m talking about the Instant Pot.
This recipe uses the pressure cooker to make homemade banana nut bread and it couldn’t be easier or more fun. Why would you want to cook bread in the Instant Pot you say? Well below are just a few reasons that you might want to give it a try.
Why cook bread in the Instant Pot?
- You don’t have time to babysit the oven.
- Your oven is broken.
- Your oven is currently in use.
- You don’t have access to an oven.
- You don’t want to heat up your kitchen.
Unless you happen to have a pan that fits in your pressure cooker (like a small cake pan), you will need a 7.5 inch Springform pan for this recipe. I’m not one to tell you to buy a new kitchen pan for just one use, so below are a few other ways that you can use the springform pan.
Instant Pot Recipes Using a Springform Pan:
- Instant Pot Cinnamon Rolls
- Instant Pot Apple Cake
- Instant Pot Cheesecake
- Instant Pot Brownies
- Instant Pot Cornbread
How to Make Banana Nut Bread in the Instant Pot:
Spray a 7.5 inch springform pan with nonstick cooking spray. (Any cake pan that will fit into the electric pressure cooker will work, but cooking time might vary slightly depending on the thickness of the batter.)
Whisk together the flour, salt, baking soda, and cinnamon. Set aside.
With a mixer, cream the butter and sugars until fluffy.
Stir together the bananas, eggs, and vanilla until well blended. Add to the butter and sugar mixture. Mix well.
Add the dry ingredients to the wet ingredients and beat together just until combined. Do not overmix. The batter will be thick.
Stir in nuts, sprinkling some on top. (optional)

Transfer the batter to the springform pan smoothing the top with a spatula.
Cover the springform pan with aluminum foil and place on a trivet with handles. (The one that came with the Instant Pot.)
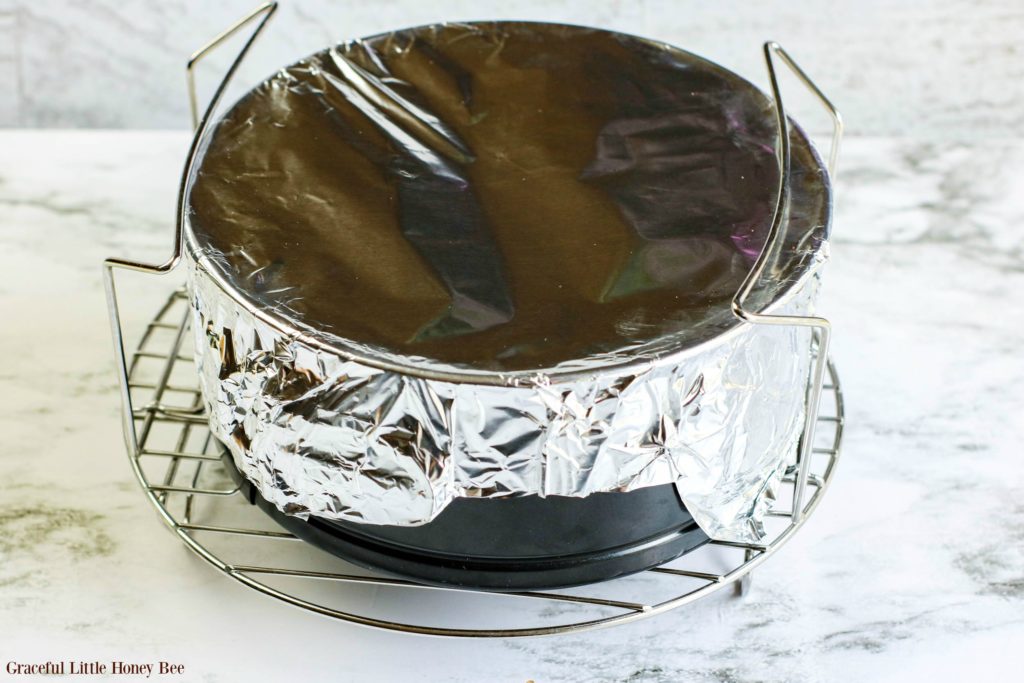
Pour water into the pot of the electric pressure cooker. Carefully lower the trivel into the pot.
Program the electric pressure cooker for 50 minutes on manual or “pressure cook.”
When the cook cycle is complete, perform a quick release of the pressure.
Remove the lid and carefully use a towel to remove the liquid from the top of the aluminum foil.
Lift the trivet from the pressure cooker and remove the aluminum foil from the springform pan.
Allow the bread to rest until any water that has accumulated on the top of the bread has absorbed or dried.
To serve, release the springform pan sides and cut the bread into wedges.

Do you want more Instant Pot recipes? Here are some of my favorites:
- 4-Ingredient Instant Pot Mac and Cheese
- Instant Pot Sausage and Lentil Stew
- Instant Pot Corn on the Cob
- Instant Pot Applesauce
Follow Graceful Little Honey Bee on:
Pinterest | Facebook | Instagram | YouTube

Instant Pot Banana Nut Bread
Equipment
Ingredients
Instructions
- Spray a 7.5 inch springform pan with nonstick cooking spray. (Any cake pan that will fit into the electric pressure cooker will work, but cooking time might vary slightly depending on the thickness of the batter.)
- Whisk together the flour, salt, baking soda, and cinnamon. Set aside.
- With a mixer, cream the butter and sugars until fluffy.
- Stir together the bananas, eggs, and vanilla until well blended. Add to the butter and sugar mixture. Mix well.
- Add the dry ingredients to the wet ingredients and beat together just until combined. Do not overmix. The batter will be thick.
- Stir in nuts, sprinkling some on top. (optional)
- Transfer the batter to the springform pan smoothing the top with a spatula.
- Cover the springform pan with aluminum foil and place on a trivet with handles. (The one that came with your Instant Pot.)
- Pour water into the pot of the electric pressure cooker. Carefully lower the trivel into the pot.
- Program the electric pressure cooker for 50 minutes on manual or “pressure cook.”
- When the cook cycle is complete, perform a quick release of the pressure.
- Remove the lid and carefully use a towel to remove the liquid from the top of the aluminum foil.
- Lift the trivet from the pressure cooker and remove the aluminum foil from the springform pan. Allow the bread to rest until any water that has accumulated on the top of the bread has absorbed or dried.
- To serve, release the springform pan sides and cut the bread into wedges.


4 Comments